Wednesday, October 31, 2012

a spooky-ish day


Today is Halloween... even though it doesn't feel like it. Maybe it's because I'm 20-something and childless, but when Halloween falls on a weekday it just doesn't have the same excitement.

My sister and me when we were little. I'm the one in red!


Like most Halloween loving adults I celebrated over the weekend. Sans costume. Sans party. (And sans scary movie!! The one thing I wanted to do!) But good times were had with good friends and that is all that matters.

So when October 31st rolled up on the calendar today I was feeling very un-Halloweenish. They didn't even wear their costumes on The Today Show this morning. Very understandable considering the aftermath of Superstorm Sandy, but disappointing at the same time.

Oh well. Happy Halloween! Hopefully next year will be better.

Friday, October 26, 2012

sunrise

Chicago skyline sunrise

Good morning! I took this photo earlier this week on Monday at 7:06am. The sunrise stopped me dead in my tracks. I was lucky my camera was nearby. What a beautiful way to start the week!

But now it's Friday! And it's the weekend before Halloween!! I don't know what I'll be doing yet, but I'd at least like to make time for a scary movie... or two : )

What will you be doing this Halloween weekend?

Tuesday, October 23, 2012

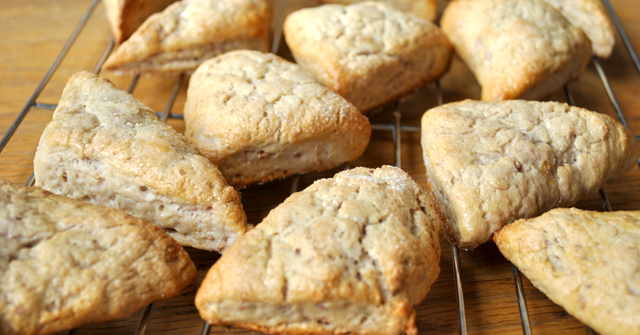
fresh baked scones


Its been pretty gloomy here in Chicago. Perfect weather to get in the mood for Halloween! The fog and rain has inspired me to "spookify" my blog. Did you notice? :D


I added some Halloween decor to my apartment too! Taped in my window are some cute paper bats to go with the leaves I put up last month. They were so easy to make! All I did was cut them out of black construction paper to get a silhouetted look.

The gloom has also inspired me to do some baking. So I came up with this scone recipe.


Yogurt Scones
2 cups flour
4 tablespoons shortening
3 teaspoons baking powder
1/2 teaspoon salt
2 tablespoons sugar
1 cup yogurt
2 teaspoons vanilla extract
fresh raspberries
1 egg (for egg wash)
sugar (for topping)

First preheat oven to 400 degrees. Then combine flour, baking soda, salt, sugar and shortening and mix in a food processor - or use a fork if you don't have one. My food processor is so small I had to do this in two batches! Oh well, whatever gets the job done. Pour into a mixing bowl and set aside.


Next mix vanilla with yogurt and add berries. I chose a strawberry rhubarb yogurt (because it was in my fridge) but you can use whatever flavor your want.


Add the yogurt mixture to the flour. Stir until combined.


Turn out onto a floured surface and knead until dough comes together, adding flour as needed. Flatten until dough is about half and inch thick and cut into triangles.


Place on a baking sheet then brush with egg wash. Sprinkle with sugar.


Bake for 15 to 20 minutes or until golden brown. I had to add a bit of time until they were perfectly browned. So much time... I lost track. Whoops!


Yum! Fresh out of the oven with a hot cup of coffee, these scones are the perfect comfort for this gloomy day. The outside has a nice crunch while the inside is dense but moist thanks to the yogurt. I can't wait to try these in different flavors!


Wednesday, October 17, 2012

spinach and bacon quiche


Everyone loves quiche. Yeah so it has a reputation as "girly food" which I believe is attributed to its name. Quiche. Well whatever, it's basically just an omelet in a pie crust! And everyone loves omelets. Therefore everyone loves quiche.

Not only is quiche yummy and comforting, it's also pretty easy to make. And I've put together this step-by-step, photo filled, quiche-making guide to make it even easier.

You'll need:
prepared piecrust (I used a frozen crust, but you can always make your own)
1/2 cup onion
2 cups fresh spinach
1/2 cup ham
3 slices of bacon
3 eggs
3/4 cup of half and half
1/2 cup cheddar cheese
1/2 cup mozzarella cheese

Now before we start I should mention that I used a frozen piecrust because I believe not every meal has to be a huge production. Sure I could have made one from scratch, but I made this quiche as a quick weekday dinner so frozen was the better option. I should also mention that measurements are approximate and ingredients can be swapped out to please your tastebuds. As long as you have the eggs and milk mixture you'll still end up with quiche.

Preheat your oven to 375 degrees.

Start by preparing the ingredients. Chop your onions and ham and set aside. Cut up the three slices of bacon and heat over medium until cooked but still tender.


Spoon the bacon pieces out onto a paper towel to drain. Try to leave as much of the bacon grease in the pan as possible. Add the chopped onion to the pan with the bacon grease and cook over medium heat until softened.


Once the onions have cooked for a bit turn the heat down to low and toss in the spinach.

When you first add the spinach it will seem like a lot. So much that you can hardly stir without spinach leaves falling out all over the place. Just put the cover on the pan for a moment. The steam will cook the spinach, wilting it down giving you more room to stir. Stir until fully cooked.  


Drain the cooked spinach and onions to get all the excess water out - you don't want it ending up in your quiche.


Sprinkle the drained spinach and onions into an even layer at the bottom of your piecrust.


Followed by the ham and bacon.


Then top with cheese.


In a small bowl mix three eggs with 3/4 cup of half and half. Slowly and evenly pour the egg mixture over your filling.


Place your quiche on a baking sheet to catch any spill over. Wrap aluminum foil around the crust to prevent browning for the first part of baking. Stick it in the preheated oven.


After 20 minutes remove the foil and bake for another 15 minutes or so until the top is sufficiently browned and the center doesn't wobble when the quiche is moved.


The hardest part... cutting into your masterpiece. You might be tempted to leave it whole just because it looks so pretty! Don't. That's dumb.

This is what a slice looks like right out of the oven. Leftover quiche can be wrapped and saved in the fridge. 


Thursday, October 11, 2012

blue and gold nails


I recently saw a photo on pinterest of a manicure that I was really excited to try. To get the look I wanted I switched up the colors and the placement of the point. I really love how they came out!

First paint a thin coat of your base color - I chose a shimmery gold. Once your nails are dry cut ten small squares of painter's tape. I used a cutting mat and razor blade to make 1/2 inch squares. Working one nail at a time apply the tape, making sure to keep the corner of the square in the center of your nail. Paint your second color (I picked navy blue) then quickly remove the tape.


It's important to work one nail at a time because you want to be able to take the tape off right after you apply the polish. If you wait to remove the tape the lines you're trying to create wont be crisp and clean.

Once you've finished with all your nails apply a clear top coat and that's it!


I love how my nails look and I can't wait to try different color combinations!

Tuesday, October 9, 2012

crochet scarf


Late last month I gave my sister a fall themed birthday gift that included two homemade projects. Last week I shared the first part of the gift which was a small polymer clay pumpkin container. It's a cute little keepsake that will hold her tiny treasures and remind her that it's fall. 

The next part of the gift I made her is a crochet infinity (or not) scarf to keep her warm on chilly fall days. The pattern for the scarf came from this lovely book on crochet. 


I highly recommend The Happy Hooker by Debbie Stroller if you want to learn crochet. When I was starting out my nose was constantly in this book. The instructions are very straightforward and easy to follow. 

The pattern I used is actually for a bolero jacket called short 'n sweet. It is a popular pattern among crocheters. I've used the pattern to crochet a few different projects so I'm pretty familiar with the stitches. I made the jacket as a Christmas gift for my mom a couple of years ago and then used the same stitches to start this ginormous blanket that I'm pretty sure I'm going to take apart. 


I didn't mean to make it this monstrously long but after working on this blanket I had the intricate lace pattern completely memorized.

Although the scarf I made for my sister is much smaller than the blanket above, it brought on a new batch of challenges. It was the first project I had completed with very thin yarn and a tiny hook.


It took some getting used to but I really love how it came out.


Once I got the body of the scarf to the right length I added a finishing border of single crochet. My original plan was to attach the edges making it an infinity scarf but after some consideration I decided to crochet a spot at the ends for functioning buttons. This way my sister can choose to wear it as a traditional scarf or as an infinity scarf. Plus I thought the buttons would be a nice finishing detail.


But before I could sew the buttons on I had other ideas for this scarf. I love the yellow thread, and it is appropriate for fall, but because my sister is blonde I figured a darker color might suit her better.


And just like that it was dark brown! The buttons I picked out are covered in a white fabric. I wanted them to stay that way so I had to wait until I was finished dying the scarf before I could sew the on.


Once they were attached I was finished! It's so satisfying to finish a project and have it come out pretty closely to how I imagined. I hope she loves it as much as I loved making it!


Thursday, October 4, 2012

polymer clay pumpkin container


Last week I mentioned that I was working on some special projects. And that I had to wait before I could share them. Well the waiting is over!

I was working on a couple of handmade gifts to give to my sister, Loren, for her birthday. Which was last week. Because she is a reader of my blog and occasional contributor I had to keep these gifts secret.

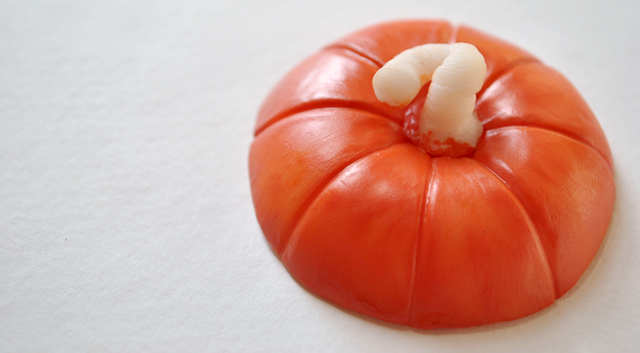
I made her two fall inspired items. The first was a polymer clay pumpkin container that I sculpted and then painted.

It started as a pinch pot that I showed in this post (way back in August) where I shared a few projects I was working on. It wasn't recognizable as anything back then so I figured it was safe to share.


I had to keep this pumpkin on the small side because polymer clay isn't the sturdiest material to work with. Once I got the pinch pot even looking I began to form it into a pumpkin.


After it was baked I spent awhile giving it a good sanding to smooth out the surfaces. Sanding also removed all the bits of dust that got stuck in the clay while I was sculpting. No matter how clean I keep my hands and my workspace, polymer clay always seems to pick up dust!


Next I sculpted a matching top with a cute curly stump. After it was baked and sanded smooth I was ready to start painting.


I used watercolor paints and was surprised how well they worked for this project. I think all the sanding   I did helped the paint stick to the surface of the baked polymer clay.


When I was finished painting I let the pumpkin dry for a few days and sprayed it with a high gloss sealant to keep the water color paint in place. And I was done!


Hmmm.... I wonder what she'll put in there?

In my next post I'll share the other gift I made for her.