Wednesday, December 19, 2012

It's that time of year...


Isn't it funny that the thing I stress most about during the holidays isn't gift giving or having enough money for gift giving...

IT'S MY WINDOW DISPLAY!

Oops, sorry for yelling...

But the stress I'm feeling is funny because it's totally unnecessary. Yes my apartment building holds this contest with a nice cash prize... but the truth is, I could win with half the effort I've been putting into it. Three winners are selected and none of my neighbors do much to try and win... There is no competition.

I guess the only competition is between me and myself. I feel this need to top myself each year. Well last year, I went a little too over the top. I'm really proud of the display I made, but there is a point when too much effort becomes a waste of time.

Last years display... Gah! So much unnecessary detail!


So this year I decided that topping myself wasn't important. It would just keep getting out of control. So last week I came up with my idea and I went for it! And the stress didn't outweigh the fun, which is how it should be.


I need a photo from street level... It looks even better from down there! And I love how the decorations I put up a couple weeks ago ties in with the display. So now that I'm finished decorating my windows I feel like I can finally relax and enjoy the holiday season!!

Merry Xmas everyone!

Friday, December 7, 2012

it's starting to feel a bit like Xmas!


I love this time of year. I always have a warm place in my heart for holiday decorating. Even though I have been so consumed with our holiday window display to even put up our tree the last few years!!

This year I'm taking a slower approach to decorating, putting different items out slowly to not cause any Xmas overload.

I started by replacing my fall leaves in the window... I'll miss them so!


They had a good run. Leaves aren't so appropriate anymore. Even though we still have yet to see any substantial snow in Chicago. Which makes me sad!

So I strung up some multicolored lights, gold shimmering garland and added a few ornaments to bring in some of that Xmas spirit.


Obviously I've got a lot more to add to the windows if I'm going to win that contest, but I'm loving how it's looking now!!

Tuesday, November 27, 2012

chocolate cake for two


So my lack of blogging has got me feeling down lately. It's my creative outlet. Even though I can't blog as much as I'd like I still have all these ideas swimming around in my head... and they're dying to get out! So frustrating.

What makes everything better when you're feeling down?? Chocolate cake of course!!


This tiny dessert is perfect if you've got a chocolate craving but you don't have the time (or the cash) to bake a full sized cake. 

I made this cake when we didn't have any sweets in the apartment and my boyfriend Nate would resort to chomping on plain chocolate chips. I'd yell "don't eat ingredients!!" but he didn't care. I decided I'd make a dessert out of the remaining chocolate chips and challenged myself to use only what I had in my apartment at the time. 

I found this recipe for flourless chocolate cake but was scared of the super low rating it was given. I also thought it was weird that it's called "flourless" but theres flour in it. And quite a bit if you consider the flour to "other ingredients" ratio. Typically I would turn my nose up to this recipe... but I used it because I had all the ingredients. And I'm so glad I did!

This is what you'll need.


1/3 cup semisweet chocolate chips
3 tablespoons unsalted butter
1 tablespoons sugar (original recipe calls for 3)
1/4 teaspoon vanilla
1 egg
1 tablespoon flour

1/4 cup milk chocolate chips (for topping)
1 teaspoon butter (for topping)

Thats it! Only 6 ingredients! And because this recipe is "for two" you don't need much of each. I mixed everything up in a microwave safe tupperware bowl to keep the mess to a minimum. 

Here's how to make it. 

1) Preheat your oven to 350 degrees. 

2) Add chocolate chips and butter to a microwave safe bowl. Use your microwave to melt the chocolate in 15 second intervals, stirring in between. This step doesn't take too long but heating the chocolate 15 seconds at a time is important. This way, the chocolate gets warm enough to melt but it never really gets hot. You really don't want your chocolate to burn.


3) When your chocolate is smooth and melty mix in the sugar and vanilla. Stir in the egg. Stir in the flour. Batter - done. 


4) Grease your baking apparatus. I chose a small springform pan but you can use ramekins or even a lined cupcake tin. (Note: you wont be able to fill the whole tin... just 2 or 3 cups)


5) Bake for 15 to 20 minutes until cake is set. The center might be a little underdone, but I welcome the fudgy texture. If you don't, pop it back in the oven for a few more minutes. Let your cake cool completely before removing it from the pan. 


6) Decorate! This step is optional of course... but why not make this tiny dessert pretty? I melted some more chocolate chips (milk chocolate this time) and just a bit of butter to make a thick ganache. I swirled the chocolate on top and placed a raspberry in the center. Pretty and delicious.  


After taking a bite I was shocked at how good this tiny cake was! It's like a rich, decadent brownie. Not too sweet. The milk chocolate ganache on top firmed to a delicious fudge, so good I'd recommend it over any other toping. 

This cake is so quick and easy I've made it a few times since discovering the recipe. It's the perfect dessert for two! 

Monday, November 19, 2012

oh no.

Sad face. I feel like I've been ignoring my poor blog lately. I've been pretty busy with work and some other projects.

I wish I could blog all day long, coming up with new crafts and recipes but there just aren't enough hours in the day! And with the holidays on their way I'll be even busier. I'm sure all of us will be!

Hopefully I'll find some time next week to share some of the projects I've been working on. Until then, Happy Thanksgiving! I hope everyone has a wonderful holiday!

Tuesday, November 6, 2012

upcycled jewelry boxes


It's a running joke in my family that I'll save anything. (Un)fortunately I can usually see some sort of potential use for most trash worthy items. And those trash worthy items are kept whether their potential use is carried through or not. It's a curse stricken on the crafty, and I've got it bad.

One particular kind of item I've been saving lately for future upcycling projects are old jewelry boxes. No, I'm not talking about what might be sitting on your dresser right now, filled with necklaces, bracelets and rings. I'm talking about the boxes that necklaces, bracelets and rings come in.


You'd have to be blind not to see all the possibilities! All the different things you can do with those boxes! I mean, you can keep stuff in them, and...

and...

Well that's pretty much it. BUT if you can think of your box as a blank canvas then the styling possibilities inside and out are truly endless. As usual, all the decor options are making me feel a bit overwhelmed. But that doesn't stop me from putting these boxes to use while they are still blank. It gives me time to consider any cosmetic updates before making a commitment.

Hold on a second. There is some work to be done before your old jewelry boxes can be used. They don't usually open very wide. To fix this slowly and gently bend the box open, pulling the lid backwards, until you've reached your desired level of openness. And don't forget to remove the jewelry-holding innards. Some of the innards should be kept as a template when you're ready to add some flare to the inside of the box.

I often use my largest box to hold vital items while traveling. Items such as spare rubber bands, bobby pins, jewelry, lip balm, and a perfume sample or two (samples are so much easier to travel with than your full bottle so stock up on your signature scent!) I load up the box, snap it shut, and I'm good to go!

The inside of the box is pretty raw. 

Think of all the fabric lined possibilities! You could even add a mirror and dividers for a high class travel case. 


I use one of my smaller boxes for... drumroll please... earbuds! Obviously. There is absolutely nothing worse than loose earbuds floating around your bag. Never staying neatly wrapped around your iPod as you hoped. Well, problem efficiently solved.


Next time you're gifted some jewelry don't get distracted by all the shine and sparkle. Make sure to hang on to the real treasure... the box it came in.

What kind of things would you keep in your upcycled box? How would you decorate it?

Wednesday, October 31, 2012

a spooky-ish day


Today is Halloween... even though it doesn't feel like it. Maybe it's because I'm 20-something and childless, but when Halloween falls on a weekday it just doesn't have the same excitement.

My sister and me when we were little. I'm the one in red!


Like most Halloween loving adults I celebrated over the weekend. Sans costume. Sans party. (And sans scary movie!! The one thing I wanted to do!) But good times were had with good friends and that is all that matters.

So when October 31st rolled up on the calendar today I was feeling very un-Halloweenish. They didn't even wear their costumes on The Today Show this morning. Very understandable considering the aftermath of Superstorm Sandy, but disappointing at the same time.

Oh well. Happy Halloween! Hopefully next year will be better.

Friday, October 26, 2012

sunrise

Chicago skyline sunrise

Good morning! I took this photo earlier this week on Monday at 7:06am. The sunrise stopped me dead in my tracks. I was lucky my camera was nearby. What a beautiful way to start the week!

But now it's Friday! And it's the weekend before Halloween!! I don't know what I'll be doing yet, but I'd at least like to make time for a scary movie... or two : )

What will you be doing this Halloween weekend?

Tuesday, October 23, 2012

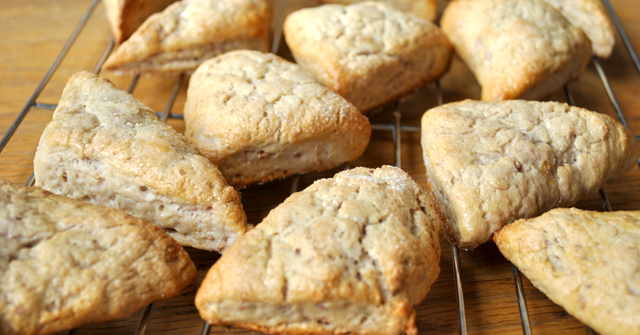
fresh baked scones


Its been pretty gloomy here in Chicago. Perfect weather to get in the mood for Halloween! The fog and rain has inspired me to "spookify" my blog. Did you notice? :D


I added some Halloween decor to my apartment too! Taped in my window are some cute paper bats to go with the leaves I put up last month. They were so easy to make! All I did was cut them out of black construction paper to get a silhouetted look.

The gloom has also inspired me to do some baking. So I came up with this scone recipe.


Yogurt Scones
2 cups flour
4 tablespoons shortening
3 teaspoons baking powder
1/2 teaspoon salt
2 tablespoons sugar
1 cup yogurt
2 teaspoons vanilla extract
fresh raspberries
1 egg (for egg wash)
sugar (for topping)

First preheat oven to 400 degrees. Then combine flour, baking soda, salt, sugar and shortening and mix in a food processor - or use a fork if you don't have one. My food processor is so small I had to do this in two batches! Oh well, whatever gets the job done. Pour into a mixing bowl and set aside.


Next mix vanilla with yogurt and add berries. I chose a strawberry rhubarb yogurt (because it was in my fridge) but you can use whatever flavor your want.


Add the yogurt mixture to the flour. Stir until combined.


Turn out onto a floured surface and knead until dough comes together, adding flour as needed. Flatten until dough is about half and inch thick and cut into triangles.


Place on a baking sheet then brush with egg wash. Sprinkle with sugar.


Bake for 15 to 20 minutes or until golden brown. I had to add a bit of time until they were perfectly browned. So much time... I lost track. Whoops!


Yum! Fresh out of the oven with a hot cup of coffee, these scones are the perfect comfort for this gloomy day. The outside has a nice crunch while the inside is dense but moist thanks to the yogurt. I can't wait to try these in different flavors!


Wednesday, October 17, 2012

spinach and bacon quiche


Everyone loves quiche. Yeah so it has a reputation as "girly food" which I believe is attributed to its name. Quiche. Well whatever, it's basically just an omelet in a pie crust! And everyone loves omelets. Therefore everyone loves quiche.

Not only is quiche yummy and comforting, it's also pretty easy to make. And I've put together this step-by-step, photo filled, quiche-making guide to make it even easier.

You'll need:
prepared piecrust (I used a frozen crust, but you can always make your own)
1/2 cup onion
2 cups fresh spinach
1/2 cup ham
3 slices of bacon
3 eggs
3/4 cup of half and half
1/2 cup cheddar cheese
1/2 cup mozzarella cheese

Now before we start I should mention that I used a frozen piecrust because I believe not every meal has to be a huge production. Sure I could have made one from scratch, but I made this quiche as a quick weekday dinner so frozen was the better option. I should also mention that measurements are approximate and ingredients can be swapped out to please your tastebuds. As long as you have the eggs and milk mixture you'll still end up with quiche.

Preheat your oven to 375 degrees.

Start by preparing the ingredients. Chop your onions and ham and set aside. Cut up the three slices of bacon and heat over medium until cooked but still tender.


Spoon the bacon pieces out onto a paper towel to drain. Try to leave as much of the bacon grease in the pan as possible. Add the chopped onion to the pan with the bacon grease and cook over medium heat until softened.


Once the onions have cooked for a bit turn the heat down to low and toss in the spinach.

When you first add the spinach it will seem like a lot. So much that you can hardly stir without spinach leaves falling out all over the place. Just put the cover on the pan for a moment. The steam will cook the spinach, wilting it down giving you more room to stir. Stir until fully cooked.  


Drain the cooked spinach and onions to get all the excess water out - you don't want it ending up in your quiche.


Sprinkle the drained spinach and onions into an even layer at the bottom of your piecrust.


Followed by the ham and bacon.


Then top with cheese.


In a small bowl mix three eggs with 3/4 cup of half and half. Slowly and evenly pour the egg mixture over your filling.


Place your quiche on a baking sheet to catch any spill over. Wrap aluminum foil around the crust to prevent browning for the first part of baking. Stick it in the preheated oven.


After 20 minutes remove the foil and bake for another 15 minutes or so until the top is sufficiently browned and the center doesn't wobble when the quiche is moved.


The hardest part... cutting into your masterpiece. You might be tempted to leave it whole just because it looks so pretty! Don't. That's dumb.

This is what a slice looks like right out of the oven. Leftover quiche can be wrapped and saved in the fridge.